Install Git
Install Git on Windows
Please note: You may need administrator's rights to install the Git software. If you do not have Administrator's rights, please contact your computer support team.
- Navigate to http://git-scm.com/
- The webpage will auto-detect what operating system you are using on your machine and provide you with the download for that OS. Look for the computer screen on the right-hand side of the page. Click on Downloads for Windows. Your computer should automatically launch an explorer window and ask you where to save the program on your computer.
- On your computer, navigate to where you want to save the Git program .exe file and double-click on the file. This should launch the installer.
You may receive a security warning about the software being from an unknown publisher. You can safely ignore this message. Click the Run button to continue or cancel to exit out of the installation. - The Welcome to the Git Setup Window window will appear. Begin installation by clicking Next.
- Click Next to accept the terms of the license.
- Next, choose where Git will be installed. Click Next to choose the default location provided unless you know you need to install the software somewhere else on your machine.
- Next, select the components you want installed along with the Git software. There are already some default options checked. Other options that you might want to check include:
- Windows Explorer integration, including Git Bash Here and Git GUI Here. This component will allow you to use the Windows Explorer context menu to access git Bash and Git Gui.
- All other components are optional.
- Next, Select your Start menu Folder. Choose Next to use the default.
- Next you need to choose how you would like to use Git from the command line. Choose the second option "Run git from the Windows Command Prompt". This will allow you to use Git Bash and the Standard Windows prompt. Do not choose the third option as choosing this option may change settings on your machine that may affect other installed programs.
- Next, you'll need to choose an option for how Git should treat line endings in text files. If you're planning on sharing your project with others who may be using a different operating system, choose Checkout Windows-style, commit Unix-style line endings.
- Choose Next to start the installation.
- Click Finish to exit the installer.
You can access Git bash or the Git GUI in a couple of ways:
- Open the Start menu, you'll find a new Git folder with both Git gui and Git Bash icon
- Using the Windows Explorer context menu
- Navigate to a folder on your machine
- Right click inside the folder. You'll notice two new options in your context menu: Git Bash and Git Gui
OK, Windows user, you're almost done. Follow the steps for authenticating with GitHub, and then you'll be ready to practice.
Install Git on a Mac
There's a chance Git is already installed on your Mac. Open up a terminal window and run "git". If you get a long list of commands, you're probably ready to go. If the terminal says something about not knowing what you're talking about (you may see something about "no developer tools"), you'll have to install it:
Go to the git-scm downloads page and download the newest version of Git. When you open up the downloaded installer, the program will walk you through the set up, which is a quick process.
You can put in some configurations now - these will be added to every project you start on your computer. Open up your Terminal and run:
You're ready to start working with Git on your computer! One last thing, though - you'll want to set up a SSH key on your computer and add that to your GitHub account. That way you can push and pull projects between your computer and GitHub with ease.
Install Git on Other Platforms
So you're not using Windows or Mac? We're impressed! Try git-scm/downloads for your OS and follow instructions from there.
Set up an SSH key to authenticate with GitHub
If you run the following command, it will create a key on your computer. If you think you already have a key, you can run ls -al ~/.ssh to see if it's there - if it is, skip to the copying step.
Click enter to accept the defaults. If you choose to use a passphrase, keep it short! You should see a statement about your public information and key being saved.
The next step is to copy this information so you can paste it into your GitHub account settings. Because of the nature of the key, you'll probably want to use a special command to copy the key (as opposed to opening up the document in a text editor and copying it from there).
Copying on a Mac
Copying on a PC
If "clip" doesn't work on your PC, try: cat ~/.ssh/id_rsa.pub
Paste your key into your GitHub settings
The last step in authenticating with GitHub is to log in to GitHub, go to your settings page (to do this, click on your profile picture and select "Settings from the drop down menu"). Once you're on the settings page, click "SSH Keys" on the left-hand menu, then "Add SSH key".
Is this step not working well for you? You can try another way to authenticate: See GitHub instructions for authenticating through https and a credential tool.
Practice Git
Fork & clone a repository
Visit GitHub and fork our repository at https://github.com/hklish01/gettingtoknowgit. You can of course clone whatever repository you'd like, but for the purpose of this practice, go ahead and fork ours.

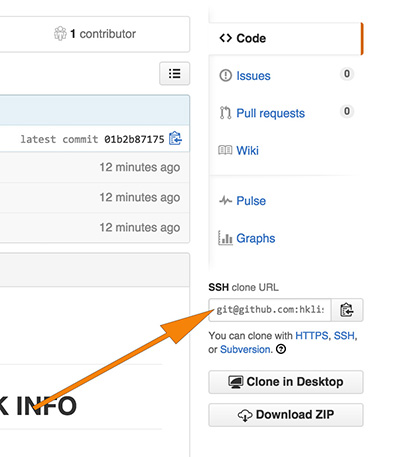
Go to the forked copy of the repository, and grab the code to clone it (if you've set up your SSH key, get the SSH address).
On your local computer, go to a directory where you don't mind having a practice file. If you're on a PC, do this within the Git Bash application.
Make a change to your repository
Make a change to a file - Make any of the proposed additions below:
- Add information about banned books to the banned_book.txt file.
- Add a banned book to this same file.
- Add a library name and link to the libraries_info.txt file
- Add a file with a different type of information about banned books (perhaps a list of banned book events?)
- Add and commit your changes, then push them back to your repository on GitHub. Issue a pull request to the original repository.
Commit your changes
Once you've made a change, run git status to see what's changed in your repository. To commit your changes - remember that it's a two step process:- Stage the files by git add . The dot says take everything that's changed. You have to be at the root of your directory to see all the changes you've made. Git only sees what's in the current directory.
- Commit the files by git commit -m "note about your change". Remember to leave a note about the changes
Run git status again to make sure you committed all the files you want. Run git log to see a history of commits. Notice that this contains commits from before you forked the project.
Push your updated repository up to GitHub
Know push to your github repository. Just for the sake of knowing you can, take a look at the address you'll be pushing to:
You should see the Git address for your repository. You can push to multiple locations. The default one is called "origin". So to push your repository back up to your GitHub account:
What else?
You now know some basics of working with Git! It'll be easier to learn from here. You may want to practice with branches and merging. See our resources page for further tutorials and help.